Renderwow
When rendering still images and animations, Sometimes the rendering time of the rendering is longer due to a certain parameter setting. To avoid this problem, Renderwow cloud rendering platform has compiled a method to reduce the rendering time of rendering still images and animations.
1.Render parameter Settings
(1). Render map/animation size
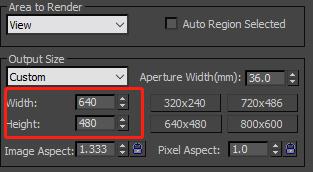
Whether the rendering size is too large. Generally, the renderings that are more than 10,000 pixels are much longer. If the length is doubled, the number of pixels will be ten times as much. This will result in the render time to increase exponentially. As a result, when rendering images of more than 10,000 pixels, paying attention to the length and width of your renderings will substantially help in the rendering time.
(2). Cover depth
The value is global control of reflection/refraction and depth of refraction, the default is 2. When this parameter is adjusted, it will cover the original reflection/refraction depth in the material. When setting the convention, it may increase the rendering time accordingly. Recommended parameters 2-5.
(3). Maximum transparency and transparency
Maximum transparency level: Controls the number of operations that are transparent. General default 50 is enough. Set the convention to affect render time.
Transparent to suspend:To a certain extent the default is 0.001”. When the value is set to 0, there are a lot of transparent objects in the scene. This can then lead to a longer rendering time than the initial. The value is zero, the above two values are best kept by default.
(4). Image sampler (anti-aliasing)
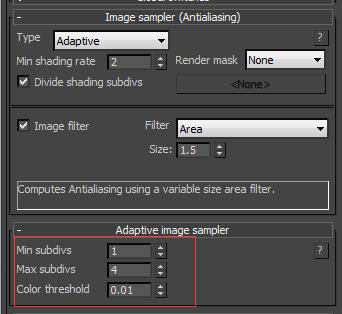
Generally, in pursuit of relatively good rendering quality, the sampler type ADAPTS.
Minimum staining rate:(Version 3.0 only has this option.)It affects only three rays. Increasing the minimum staining rate can increase the precision of “shadow/refraction”, and “blur/reflection” and “blur”. If the value is set to a high setting amount of reflection/refraction blur that is being used in the scene. Will result in the rendering time to be increased. The recommended parameters are 1-6. More than that will cause extensive rendering times.
Color threshold: Judging by the difference in the color value of the whole image. The smaller the value, the more sampling points, results in the contrast becoming greater. The default is 0.01, recommended parameters: 0.1-0.001.
(5). Global deterministic monte carlo
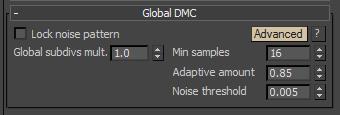
Global subdivs mult : Control the intensity of subdivision, the default value is 1, The larger the number, the longer the render time. Recommended parameters 1-3.
Adaptive amount:The lower the value, the better the rendering time. The higher the value, the longer the rendering time. Recommended between 0.6-0.85.
Noise threshold:The lower the value, the better the rendering time. The higher the value, the longer the rendering time. Recommended for 0.001-0.005, Don't set it to 0.
Min samples: Determine the sampling accuracy. The higher the value, the longer the rendering time. The effect on time isn’t effected as much.
(6). Global illumination(GI)
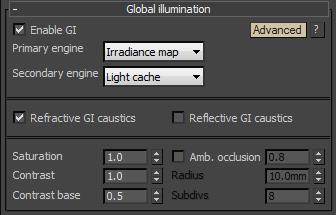
The best combination of the renderings is the irradiance map + the light cache. In the non-enclosed outdoor scene, the combination is irradiance map+BF algorithm. Try to avoid using map+BF algorithm, as this will cause the render time to become much longer.
(a). irradiance map algorithm
The current default parameters determine the time of the algorithm.
The higher the default setting, the longer the pre-pass phase is rendered.
Under the custom condition, the parameters of the luminescent graph can be adjusted freely. In particular, the maximum/minimum rate should be noted. The minimum rate cannot exceed the maximum rate. This is very important as the render time will become much longer. Maximum speed cannot be set too high(For example, over 3 will cause a larger rendering time. Unless it's in the rendering of the photon diagram phase.),Otherwise, the render time will be too long.
subdivs:It determines the number of shots that are projected on the camera, The larger the value setting, the longer the render time, It's best to stay within 20-300.
Interpolation sampling: Determining the transition between the sample points, the larger the value, the better the transition. Then increasing the value increases the render time but creates a much better image. Recommend 20-80.
(b). The light cache
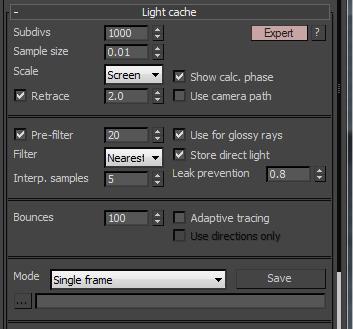
subdivs:Determining the amount of radiation that the camera ray projected in the light cache phase. The larger the value, the longer the processing time in the light cache phase. It is recommended to use 1000-2500 not too big.
sampling size:Determines the size of the light cache block sampling. The smaller the value, the longer it will the rendering will take. It is generally recommended to default between 0.01 and 0.03.
scale screen:Sampling according to the size of the screen. This is suitable for static frame rendering.
world: According to the scale unit of the model in the scene, block sampling This is suitable for animation.
If you change the original screen to the world, the rendering time increases. So, you need to increase the sample size appropriately. Need to be careful in these settings.
Bounces:The number of secondary bounce times of the camera rays is determined. The default is 100, Setting too high will cause the render time to increase, Generally keep the default at 100.
2. Setting of lighting parameters
In the V-ray light, you can check the storage irradiance map options. The original subdivision algorithm of lamplight can be transformed into an adaptive subdivision algorithm like the luminescence graph. Saves on the rendering time but will lead to the render quality to be slightly reduced.
3. Material parameter setting
In the material aspect, the acoustic rendering time is mainly reflected or refracted, reflected and refracted.
Maximum depth:The value determines the number of interactions between reflection/refraction. The default is 5, this is generally enough. Not recommended too go higher.
In general, Subdivide between 8 and 60. If the reflection/refraction blur is used in the scene it is recommended to open with interpolation. You can speed up the rendering but again, the render quality will be slightly reduced.
4. Model of the problem
In the project, if there are problem models such as broken surface and broken points, it can cause the render time to get stuck. It's usually a potted plant, Chandeliers and models with complex structures that are prone to problems.
The existence of V-ray hair material and V-ray replacement material may also lead to longer rendering time, need to pay attention to.
5. Raytrace material effects
Raytrace material effect is an important reason for rendering. If the effect of Raytrace material is not excluded before rendering, it will cause the rendering to get stuck. Generally remove all options from the default scan line renderer(Cloud operations, This option follows the machine not following the scenario.)。.
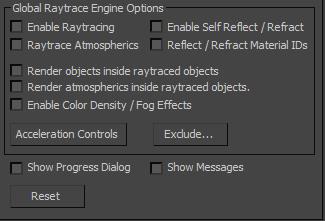
The above is the parameters and Settings that affect the render time in the normal scene. In general, the parameter setting of the panorama is higher than the parameter setting of the ordinary renderings. It's better not to exceed the threshold provided above. Otherwise this will result in the rendering time to become much longer.